cookies and cream rocky road

DSC06759

DSC06753

After a six month hiatus from food blogging; albeit certainly not from enjoying food, I’m back blogging in the New Year with rocky road so delicious I would definitely break any kind of resolution to eat it. I made, devoured (thank you Countdown for gluten free Oreo substitutes!) and gifted a few batches of this over Christmas and can safely vouch for how excellent it is – and having passed on the recipe via Facebook chat to a friend, I can thankfully remember it. This is a magnificently transportable treat for long distance gifting, however that’s not to say it needs to go far to be appreciated.

There’s not much more to say about this rocky road beyond issuing my reluctance to adjust the ingredients. It’s ridiculous to be so didactic when it comes to a recipe where you are literally just melting some chocolate and adding tasty treats, but the balance of chewy to crunchy is practically perfect and not to be messed with. Don’t underestimate the power of the salted macadamias, or the lack thereof when it comes to willpower around this.

Continue reading

chocolate cherry cheesecake

IMG_5344

I’ve never had a white Christmas, but I feel like this dessert is the perfect Southern hemisphere 25th of December post-lunch-I-don’t-have-room-but-will-eat-until-painfully-full thing to serve in that it really celebrates how excellent stone fruit is in summer. I’m a fan of pavlova, but this cheesecake is a level up in richness and aesthetics – the crown of fresh cherries atop the compote screams celebration. A little goes a long way, but I had two pieces. It’s just that good.

The waterbath method of cooking cheesecakes is new to me as of this year, but as long as your cake tin is fully sealed with tinfoil, there is nothing to be scared of, and plenty of leeway re: ensuring it doesn’t over or under-cook. I find using the waterbath imparts an even, smooth texture to the cheesecake without any dryness or browning on the top. The whole dessert process is a little tedious, but the method is simple, the result is worth it and you can make it a day in advance for theoretically reducing stress levels.

I picked up my cherries from the Hawkes Bay farmers’ market – for the compote I snagged a bag of “seconds” – ones that had been ruined/split by rainfall but still marvellous in taste. If they’re not in season, the best substitute for fresh is frozen, followed by jarred morello cherries. I’ve made this cheesecake using the original Smitten Kitchen recipe, however I’m not afraid to say I vastly prefer this version.

IMG_5334 IMG_5335 IMG_5337 IMG_5343

Ingredients:

Biscuit crumb base

  • 350g finely ground chocolate cookie crumbs (I used a gluten free variety)
  • 120g salted butter, melted
  • 60g sugar

Chocolate ganache

  • 1/4 cup cream
  • 200g dark chocolate, broken into pieces

Cheesecake filling

  • 900g cream cheese, soft at room temp
  • 1 1/2 cups sugar
  • 1 tsp vanilla
  • 4 eggs

Cherry compote

  • 700g pitted fresh cherries
  • 100g caster sugar
  • Juice of one lemon
  • 1 tsp vanilla extract

Method:

  1. Preheat oven to 350F/180C bake setting. Wrap the exterior of a 9inch springform baking tin tightly with tinfoil – I used 4 layers.
  2. Make the crust by stirring together the cookie crumbs, melted butter, sugar. Press into the baking tin firmly, using a glass or measuring cup to set the crust up around the sides of the tin by ~1 inch. Bake in the oven for 15 minutes to crisp up. Let cool. Reduce oven temp to 325F/160C
  3. Make the ganache by bringing the cream to simmer in a small saucepan. Remove from heat and stir in the dark chocolate until melted. Pour over top of the base and spread evenly. Cool to room temperature and then store in the fridge while making the filling.
  4. To make the filling, in a large bowl beat the soft cream cheese with an electric mixer until fluffing up – around 2-3 minutes. Add the sugar gradually, in a slow steady stream if using a free-standing mixer or in spoonfuls if using a hand-operated one. Beat in the vanilla. Add eggs one at a time, mixing until just combined.
  5. Prep the compote by bringing the cherries, sugar, vanilla and lemon juice to simmering over medium heat. Stir frequently and cook for around 10-12 minutes to reduce the liquid and help it go syrupy.
  6. For the cherry ripple, use the remaining liquid that has come off the cherry compote and a few (10 or so) of the cherries). Blitz in a blender to achieve a syrup consistency. Store the rest of the compote in the fridge until needed.
  7. Pour the filling on top of the cooled crust/fudge layer. Drop small spoonfuls of the cherry ripple syrup into the filling in a vaguely artistic manner. Use a chopstick or skewer to ripple it through the filling.
  8. Place the cheesecake in a large roasting dish that fits the tin easily. Carefully pour just-boiled water around the tin so it reaches around halfway up.
  9. Bake the cheesecake in its waterbath for around 80-90 minutes (depending on your oven). Check on it frequently from around 1 hour – it should have the consistency of nearly-ready jelly in the middle when ready, and a skewer should come out reasonably clean, without liquid filling covering it.
  10. Cool to room temperature before covering with the reserved cherry compote, decorating with a few fresh cherries as a ~crown~ if desired. Store in the fridge for at least 6 hours before serving (overnight!).

IMG_5355

christmas ham and brie omelette

DSC04973

Leftover ham is pretty ubiquitous after Christmas events, right? We hosted a barbecue at our apartment a few weeks ago and a fortnight later, the leg was still kicking around (albeit looking a little worse for wear), despite being carved up generously to serve sixteen people. While it kept pretty well for the first week, by the second it was looking a bit dry and unappealing. I made this omelette variation at least twice, and it would be a surefire way to feed the masses on boxing day whilst clearing out the fridge from looking like a yuletide hangover amidst unwanted rum balls with too many raisins, brandy butter that was left out in the sun, etc. etc.

I’ve only really persevered with making half-decent omelettes recently. Previously I’ve been inclined to throw in the towel prematurely and call it a scramble. However, I think there’s a certain elegance to being able to fold the cooked egg in half, sliding it onto the plate with the delicious fillings (ugh, I can’t find a good word to use here, oozing, seeping, all seem far too revolting) melting out. I would probably eat them for any meal of the day – and in fact, I have done.

DSC04970 DSC04971 DSC04968

For 1 omelette (multiply as needed to serve a group):

  • 3 eggs, beaten lightly with a fork
  • ~100g ham off the bone, thinly carved
  • 50-70g brie, thinly sliced
  • Small handful roughly chopped fresh parsley
  • Salt and freshly ground black pepper
  • A little butter to oil the pan (I used Whitestone manuka smoked butter)
  • (I also served mine alongside asparagus fried in the butter alluded to above)
  1. I prepped my vegetable side in advance (asparagus in butter because they are in season, but this would also go well with fresh watercress, fried mushrooms, rocket/arugula), frying the fresh asparagus until browned in the smoker butter.
  2. In the same small nonstick pan, melt a pat of the smoked butter before pouring in the beaten eggs over a medium heat. Arrange the ham and brie to cover (don’t worry about overlapping) one half of the eggs before seasoning with salt, pepper and sprinkling with the herbs.
  3. Allow the egg to cook enough that the omelette is starting to set around the edges and if you lift to check on the base, it’s looking a little ~bronzed~. This means it’s ready to flip! With a fish slice, get under the half of omelette without toppings and fold it over the ham and brie. Press down to set it in place and leave to cook a little longer so it can set.
  4. Slide onto plate, serve, eat. This entire process takes ~5 minutes tops – if serving multiple people, ideally have more than one pan of the same size on the go at once, or at least have your oven on warm so plates can be kept ready for serving.

DSC04974

rocky road version mum.0

IMG_5128

While I identify reasonably strongly with my mother’s Dutch side of the family (or pehaps just use at an excuse for “going back to my roots” when I bleach my hair every 8 weeks) and can appreciate the odd rollmop (pickled herring fillet) when the mood strikes me, I’ve never really been on board with the whole aniseed thing. My mother, on the other hand, is such a licorice lover, to the extent where she even enjoys the particularly salty varieties of Dutch drop. I’m not the fussiest of eaters, however I am ever thankful for the fact licorice isn’t inherently gluten free, providing me with the perfect excuse to never “try” to like it.

IMG_5120

Continue reading

malted fudge candy-cane slice

DSC04991

Chocolate, mint and candy-canes – it’s a surefire way to bring Christmas cheer and chewing to the masses. I’ve made this previously, and have adapted the recipe for the season around a Malteser creation I used to reserve for birthday presents on a student budget (clearly not great financial planning on my part, those crunchy chocolate balls never come cheap). This is once again a treat I cannot eat, and so unfortunately I can only vouch for its deliciousness on the basis of how quickly it disappears and the apparently sincere compliments. There’s no baking required, and the most complicated bit is making sure you haven’t eaten too many chocolate melts in the process so there’s plenty to spread over the top.

DSC04984

IMG_5051

Makes enough to divide into three decent treat size gift packages:

  • 100g butter
  • 75g golden syrup
  • 150g milk chocolate
  • 250g mint slice biscuits (chcoolate covered cookies with a mint fondant topping)
  • 250g malt biscuits
  • 100g white marshmallows (optional, but adds to the fudginess)
  • 300g milk chocolate melts for topping
  • 100g white chocolate melts for marble effect
  • 5 candy canes, blitzed to bits in the food processor for decorating
  • White sugar pearls (optional)DSC04982
  1. In a food processor, blitz the candy-canes, malt and mint slice biscuits in separate biscuits (or put in sturdy plastic bags and bash them with a wine bottle or rolling pin, whatever). Aim for the candy canes to be in a variety of crumbs-chunk size for sprinkling, set aside in a separate bowl for decorating. Go for a crumb consistency of the malt biscuits, and then make sure the mint slice bits are roughly in larger and smaller “bits”.
  2. Grease a deep baking dish with greaseproof paper, ~22 x 33cm in size.
  3. Over medium heat, melt the golden syrup, butter and first quantity of white chocolate until melted and combined. Set DSC04983aside to cool for 5 minutes or so before adding to a large mixing bowl to combine with the crushed biscuits and marshmallows.
  4. Press the fudge mixture into the baking dish, refrigerate to speed up the cooling process while prepping the chocolate topping.
  5. Using the double boiler method for greatest success re: even chocolate melting, bring a small saucepan of water to simmer and place a heat-safe bowl on top with the milk chocolate. Stir frequently until melted through, then smooth over the fudge cookie base. In a clean bowl, melt the white chocolate and drop small blobs of it at random over the melted milk chocolate before squiggling it into a marbled pattern with a chopstick or skewer (just something thin you have on hand) – see right for demo. Sprinkle crushed candycanes on top.
  6. Refrigerate for an hour or two to cool, then cut into rough sized small chunks with a warmed knife.

Stores in the refrigerator for up to a week in an airtight container.

IMG_5045

salty caramel chocolate christmas crackers

DSC04987

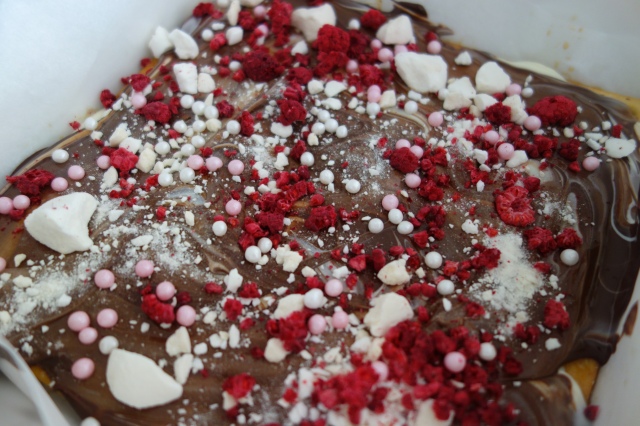
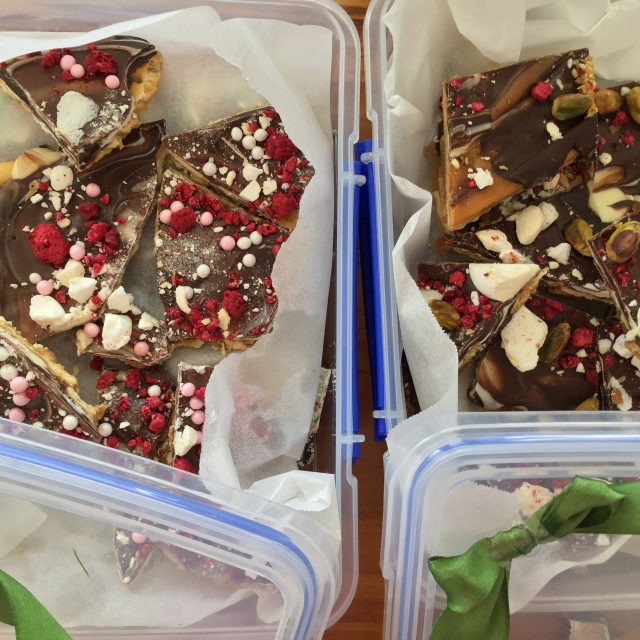
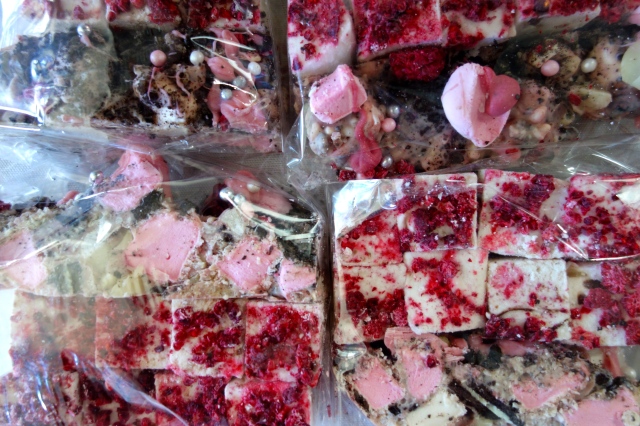
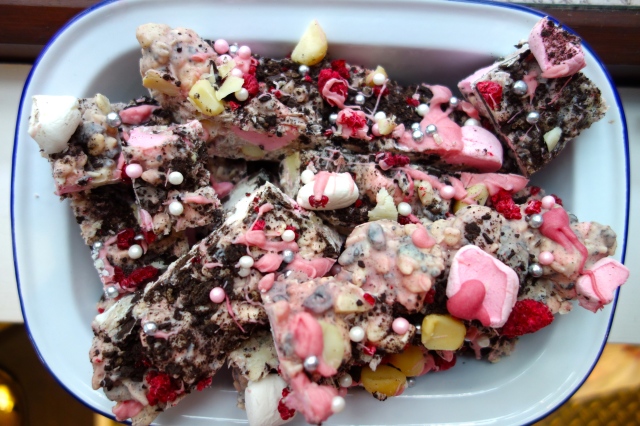
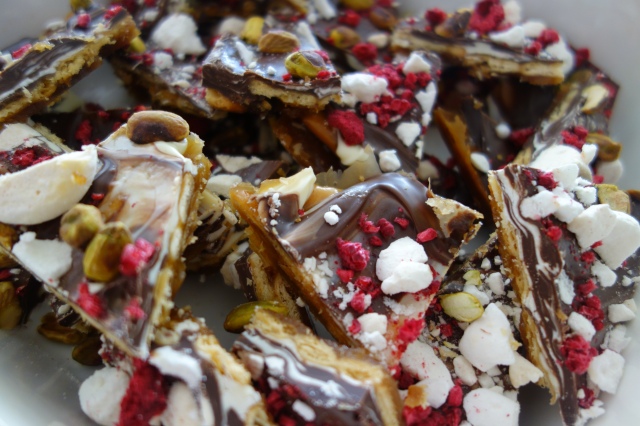
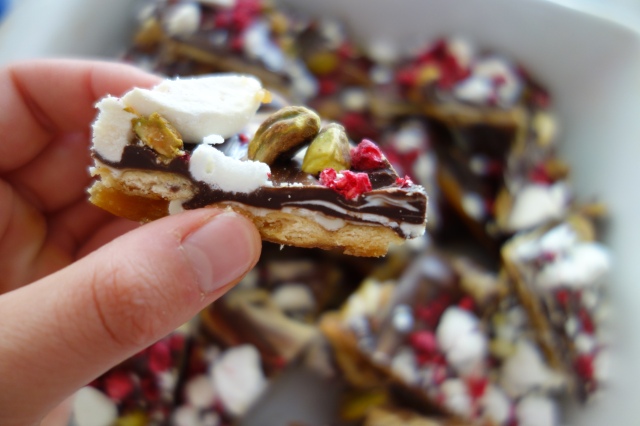
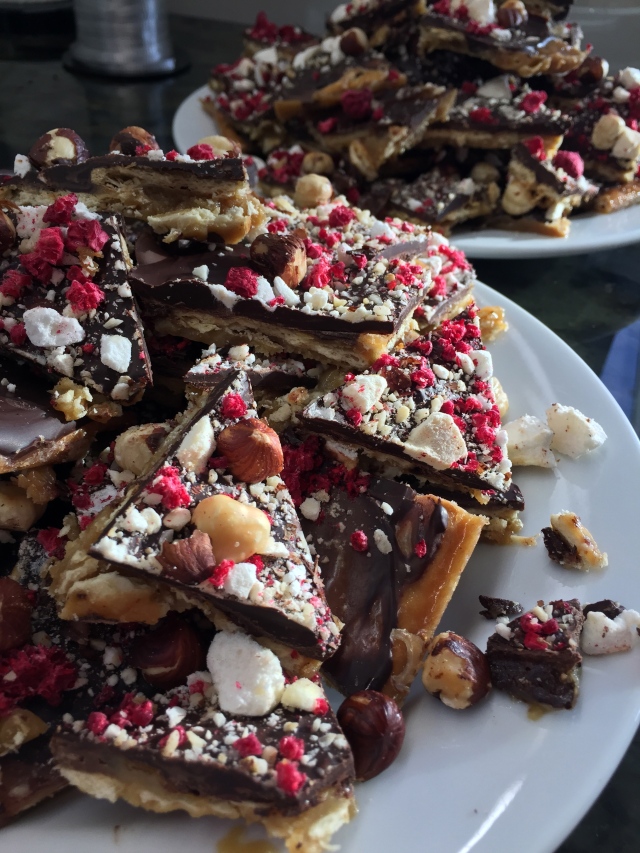
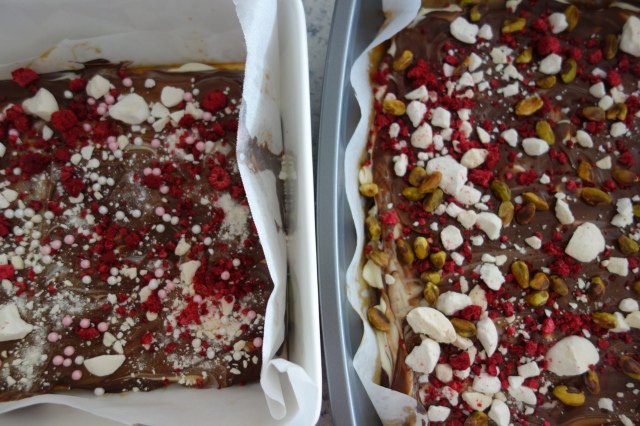
These are undeniably visually gorgeous creations, however I can only attest to the deliciousness of these based on the fact that they have never lasted in the company of emergency department staff for more than half an hour, and that after “only having a small bit” people tend to wind up having an altogether “bigger bit” as a result of seconds (“I can’t tell if this is sweet or savoury – I think I need to have more to figure it out”), thirds and “don’t let the crumbs go to waste”. I like topping them with crushed meringues and freeze dried raspberries (made by a New Zealand company – available at gourmet food shops for ~$12 a pack – a little goes a long way, and I certainly don’t even use a quarter for an entire double batch) for a candy-cane effect, along with a nut of some description to break up the colour a bit.

DSC04986

Tips and tricks: I’ve now made two double batches of this, the first of which, I used Whittaker’s dark chocolate and roughly chopped it myself, the second, I opted for Nestle melts and found the process entirely less fussy. I always toast nuts myself in a nonstick frypan, simply because I find it easier to eyeball them and stir occasionally while I get on with tasks – not to mention that hand-roasted nuts taste better than store-bought any day. I’m slowly getting more comfortable with the whole sugar on the stove turns to caramel thing, and I would say that provided you’re using a low enough heat, you have plenty of time to make sure the butter and sugar are dissolved before pouring (I’ll often try and pre-empt burning and realise that the melted butter atop crackers isn’t going to be particularly appealing and have to go back). Make sure the caramel gets a good bubble on it before removing it from the oven, and a tan. One of my batches didn’t set particularly well which made it a little too messy for transport.

DSC04980 IMG_4629 DSC04979

Recipe taken from my auntie, who found it in Dish magazine

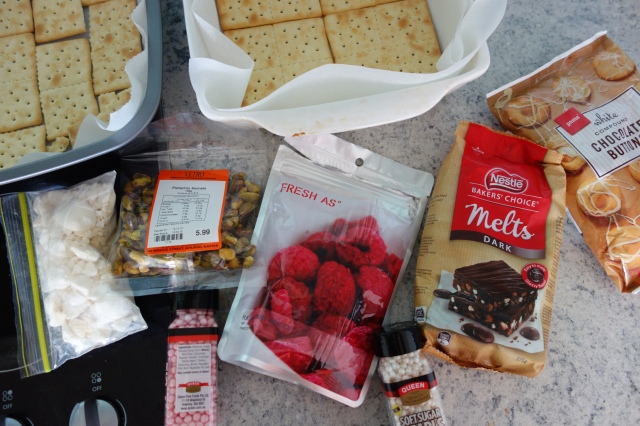
Ingredients (I have never made a single batch, and prefer to double it to provide treats for many):

  • 100g plain salted crackers (I used Salada)
  • 225g butter
  • 3/4 cup brown sugar
  • 250g dark chocolate melts (I used a whole mix of dark, white and milk for my second batch)
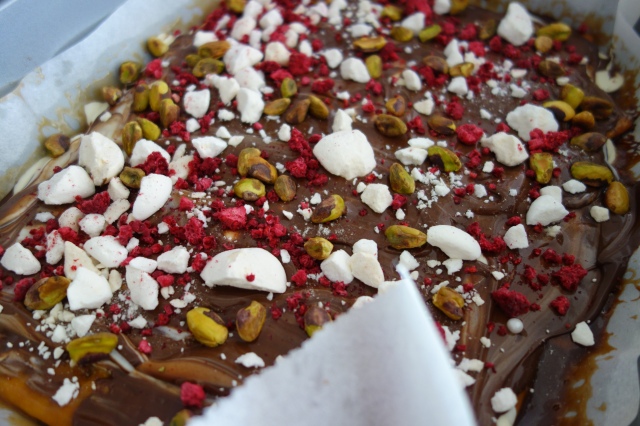
  • TOPPINGS: I went for freeze-dried raspberries and store-bought meringue on all my batches, omitting nuts for sugar pearls for a nut-free version, and sprinkling toasted pistachios and hazelnuts on my other variations. I think it could be great to do a deconstructed rocky-road version with chopped marshmallows, glace cherries and salted peanuts, however 100% go wild with any fruit/nut combination you fancy

Method:

  1. Preheat oven to 190C/370F bake setting.
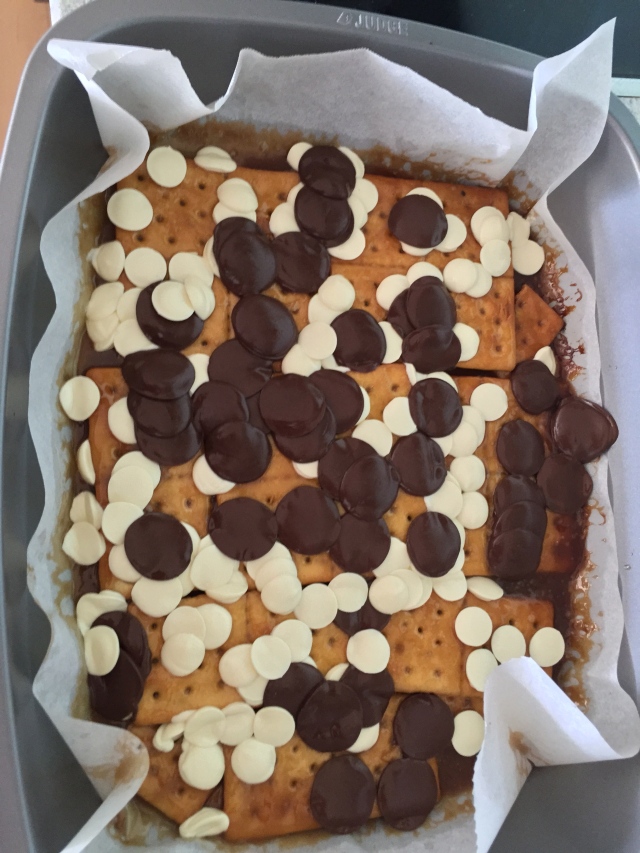
  2. Line a shallow 22x33cm (so the recipe specifies, I really just use what I have on hand and fit the crackers accordingly) baking tray (but not a cookie sheet or you will have ++caramel mess) with baking paper, greasing it a little beforehand to secure the paper.
  3. Arrange the crackers along the bottom of the tray so it is evenly covered with no double ups. Break the crackers so they fit to do this.
  4. Melt the butter and brown sugar over medium heat in a small saucepan, stirring frequently until it starts to dissolve entirely and bubble up a bit.
  5. Pour the caramel over the crackers as evenly as possible – use a spatula to spread it out if needed. Place the tray in the oven for 10 minutes, until the caramel starts to bubble and get a nice darkened tan on it (watch frequently at the end so as to ensure it doesn’t burn!).
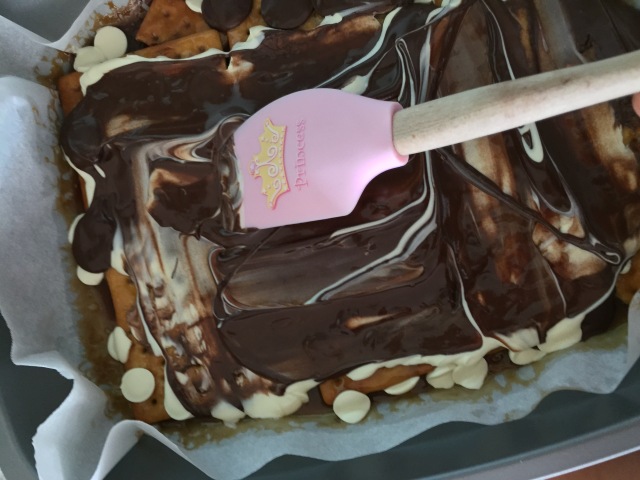
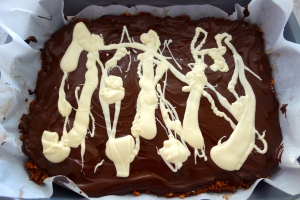
  6. Remove from the oven, and scatter the chocolate melts (or chopped chocolate) atop the cooked caramel and return to bake for 1 minute or so. This melts the chocolate so it can easily be spread with the spatula for a smooth surface.
  7. Sprinkle your toppings and admire your impending festive artistic deliciousness. Leave to cool (the fridge unsurprisingly speeds up this process) before roughly cutting into uneven triangles.

These keep for up to a week in the fridge in an airtight container.

DSC04977 IMG_5036 IMG_5037 DSC04981 IMG_5062